Summary: Creating an image of a USB drive on your system might seem a daunting process, whether for data backup or bootable drive cloning. This write-up will guide you through simple steps to ensure everyone can follow along. Let’s embark on this image-creation journey!
USB drives are essential in our digital world. They store important files, act as bootable tools for system recovery, and even carry our favorite portable apps. But these tiny wonders are not invincible. What if your USB drive fails or vanishes? That’s where creating a USB drive image on some other drive becomes a lifesaver.
Understanding USB Drive Images
Think of a USB drive image as a snapshot, capturing everything on your drive – files, system data, and all. Creating an image of USB drive is like freezing a moment in time, taking a picture of your USB drive. You can keep this image on your computer or another storage device. Later, you can use it to restore your USB drive exactly as it was when you took the snapshot.
Why Creating Image of USB Drive is Beneficial?
There are several reasons why creating an image of a USB drive is a good idea:
- Data Backup: It’s an excellent way to back up your data, ensuring you don’t lose important files even if your USB drive fails.
- System Recovery: If your USB drive is a bootable device with an operating system, creating an image can help you recover your system in case of a crash or corruption.
- Cloning: You can use the image to clone multiple USB drives with the same content, saving time and effort.
Points to Remember While Attempting USB Image Creation
Now that we know the benefits of creating USB image, now comes the important points that you need to be prepared for to have a successful imaging process.
- An Appropriate-Sized USB Drive: You must know the size of the USB drive for which you want to create an image. Following that, take a second USB drive that is at least the same size or larger than the source USB drive.
- Backup Already Existing USB Data: As this USB image creation process will overwrite complete data on the target USB, it is essential to backup the data stored in the target USB.
- USB Adapter (Optional): You might also need a USB adapter that will help you connect two USB drives simultaneously. If your computer or laptop has sufficient USB ports, then you can start creating image of USB drive without this device.
- A Reliable USB Imaging Tool: To have a hassle-free experience during imaging, it is recommended to choose a trusted and reliable USB imaging tool. These tools are specially designed to offer you an efficient and error-free experience.
How to Create an Image from Your USB Flash Drive
Meet the superhero of USB Imaging Software – EaseUS Disk Copy. This Windows-compatible tool is your go-to choice for cloning systems, disks, partitions, and more. Whether you’re rocking an HDD, SSD, SD card, or trusty USB drive, this software has got your back. And guess what? It’s user-friendly software too to create image of USB drive!
Here’s a quick rundown of what makes this tool shine:
- Clones bad sectors: Don’t let those pesky bad sectors hold you back.
- Resize disk partitions on the fly: Make adjustments as you go – no sweat!
- Effortlessly migrate your OS: Clone hard drive to SSD or even SSD to SSD without data loss.
- Create a WinPE bootable disk: Troubleshoot like a pro with a bootable disk.
Let’s Give this Solution a Try!
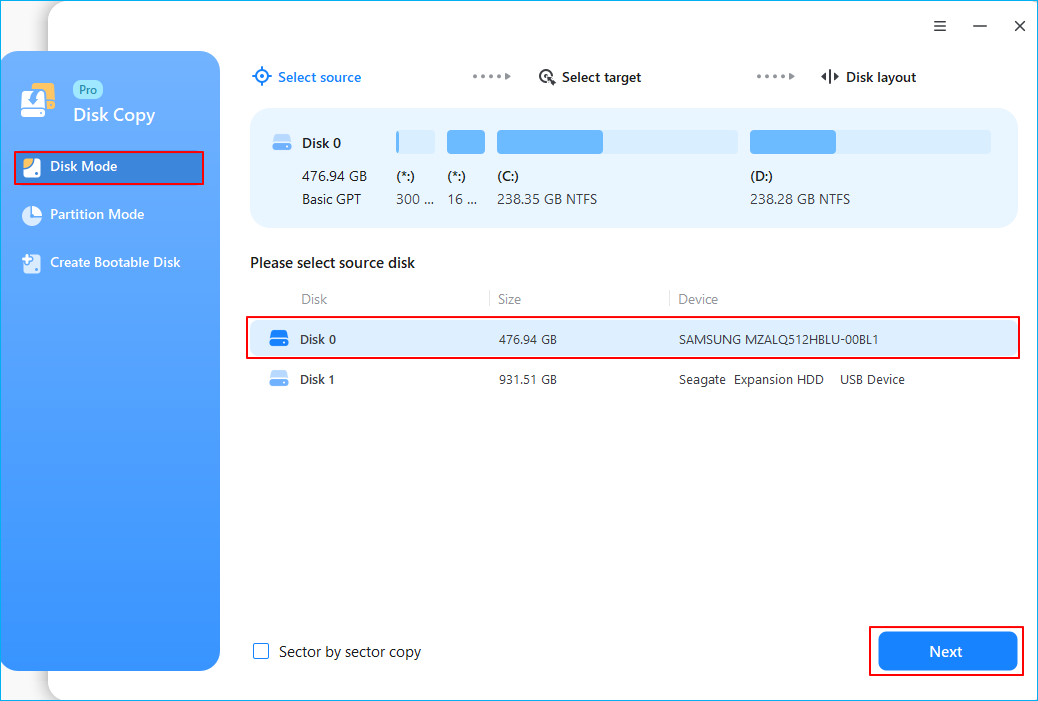
Step 1: Get Set Up
Before you start, keep in mind that for a sector-by-sector copy, your destination USB drive should be equal to or larger than your source disk to successfully create image of USB drive. Safety first, folks! Also, be warned – all data on the destination disk will be wiped, so be extra cautious.
Select your source disk under “Disk Mode” and hit “Next“.
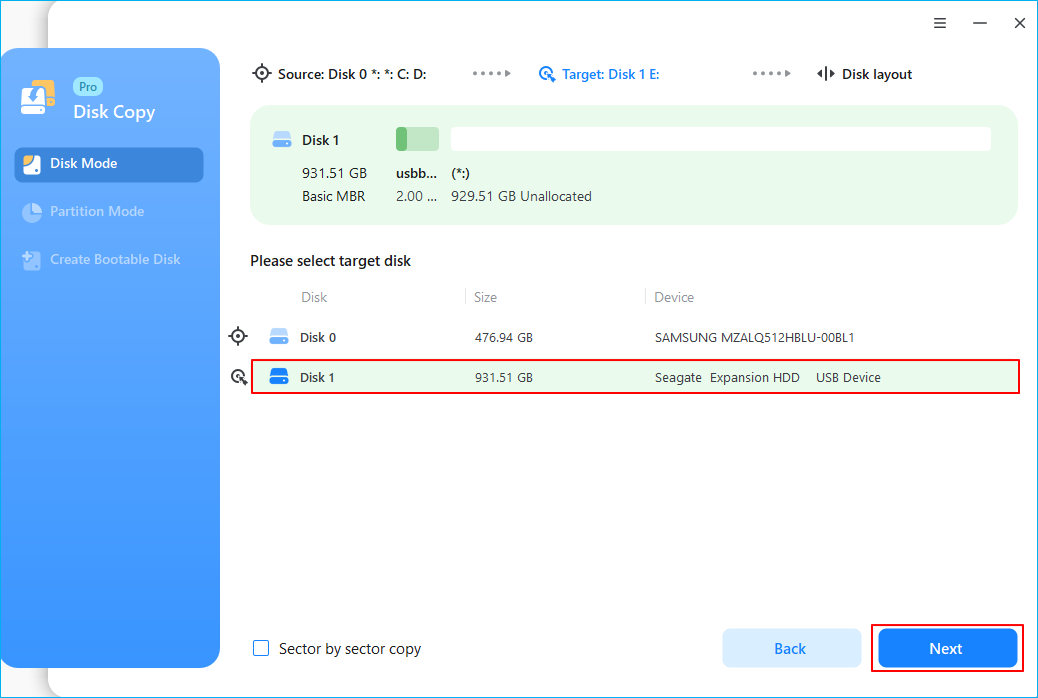
Step 2: Choose Destination Drive
Now, choose your destination disk. A warning message will pop up – it’s just giving you a heads-up about data loss. Click “OK” and then “Next” to proceed with creating USB’s image.
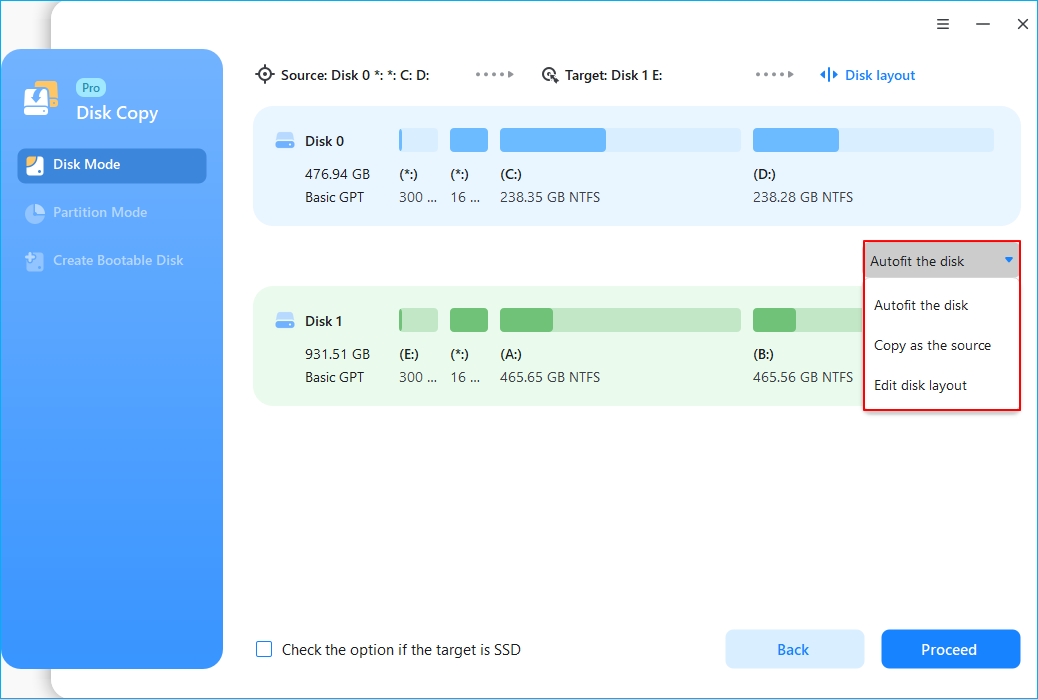
Step 3: Disk Layout
This is where you get to play around with disk layouts. Three options await:
- Autofit the disk: Let the software work its magic for peak performance.
- Copy as the source: Keep it identical to the source disk layout.
- Edit disk layout: Flex those creative muscles and tweak things manually.
Step 4: Time to Roll
Click “Proceed” to kick start the process of creating image of USB. The software will work its magic; before you know it, your USB drive’s image will be ready to roll.
Wrapping It Up
And there you have it, folks! Creating an image of your USB drive is a piece of cake with EaseUS‘s smart software. Remember, you can simply copy or back up the data for non-bootable USB drives. But cloning is your knight in shining armor when it comes to bootable USB drives. So, whether you’re safeguarding your precious data or planning an upgrade, the aforementioned has your back. Download it, give it a spin, and clone away like a pro!

GRP Pipes in Iraq ElitePipe Factory specializes in the manufacturing of Glass Reinforced Plastic (GRP) pipes, providing top-tier solutions that cater to a diverse range of industrial needs. Our GRP pipes are renowned for their strength, durability, and resistance to harsh environmental conditions. They are designed to handle high pressures and aggressive chemicals, making them an excellent choice for water distribution, sewage systems, and industrial applications. By leveraging advanced technology and high-quality materials, ElitePipe Factory has established itself as a premier provider of GRP pipes in Iraq. Our dedication to excellence and reliability sets us apart as one of the leading factories in the country. Explore our offerings at elitepipeiraq.com.