
Are you sick of manually categorizing emails in your Gmail account? Is your mailbox cluttered with a lot of emails and you want them to organize by applying labels to them? This article will help you learn the tricks to automatically label emails in Gmail and move to folder without breaking a sweat.
Having an unorganized Gmail account can hamper the efficient workflow of a user. Furthermore, all emails of an important project lie scrambled in the inbox. Thus, having labels (folders) in the account becomes important as these labels help users keep their mailbox data organized in the desired manner.
If you receive a lot of emails in a day in Gmail, then manually organizing those emails could be a tedious task. Thus, we will guide you on how you can automatically label and move emails in Gmail.
Method 1: The Filter and Label Combo
Filters and labels are like your digital assistants – they work together to categorize and organize your emails effortlessly. Here’s how to set it up:
1. Access Labels: Open Gmail settings by clicking the gear icon and selecting “See all settings.”

2. Navigate to Labels: Click on the “Labels” tab in the settings menu.
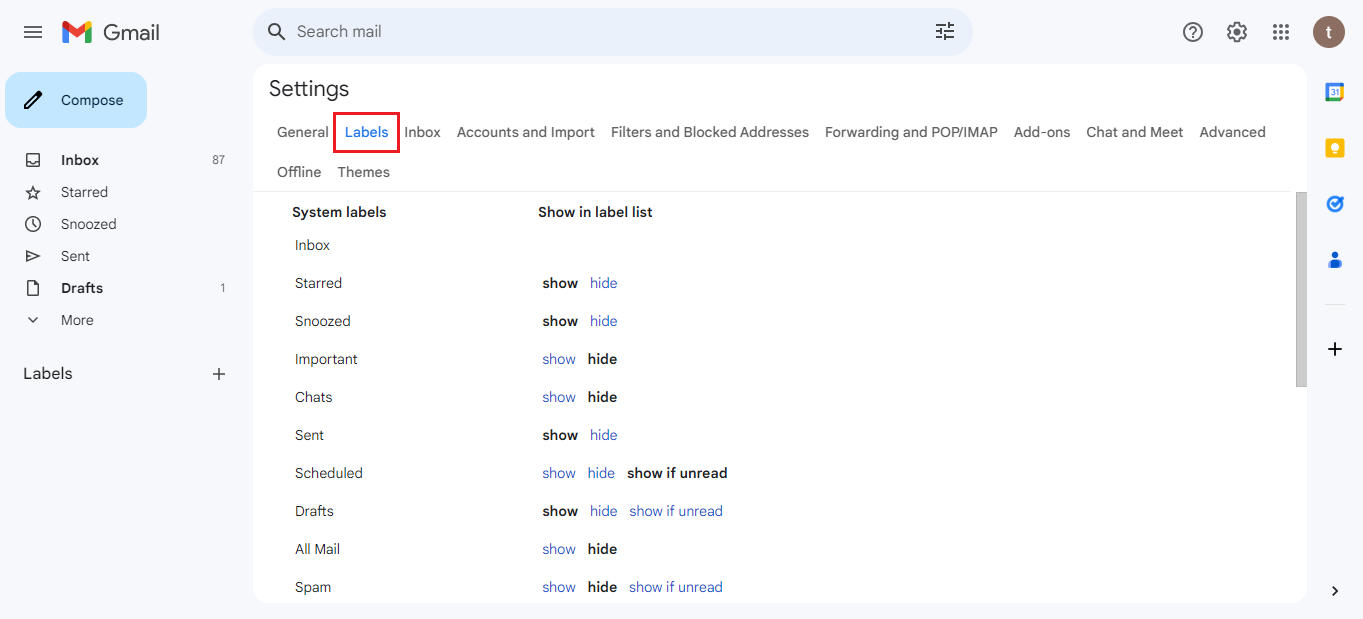
3. Create a New Label: Scroll down and find the “Create new label” section. Give your label a name and click “Create.”

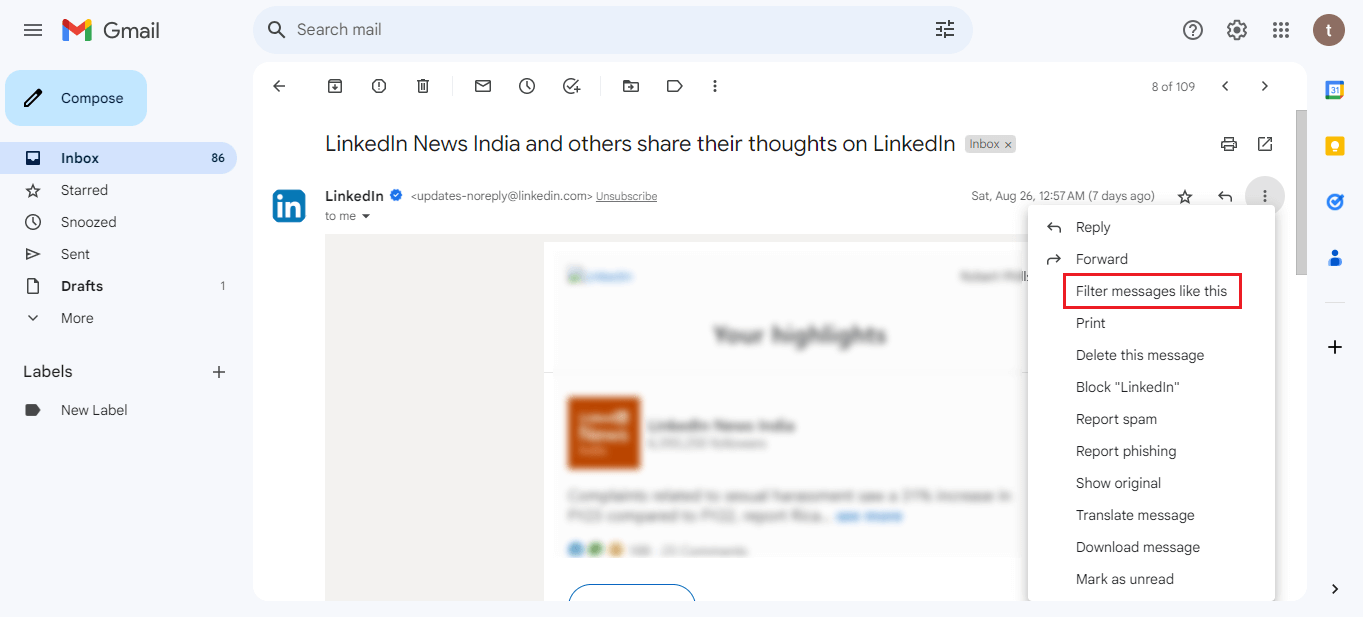
4. Access Filters: Return to your inbox, open an email you want to automatically label and move to a folder.
5. Create a Filter: Click on the email’s three dots (more options) and choose “Filter messages like this.”
6. Set Filter Criteria: Define the conditions for your filter, such as sender, subject, or keywords.
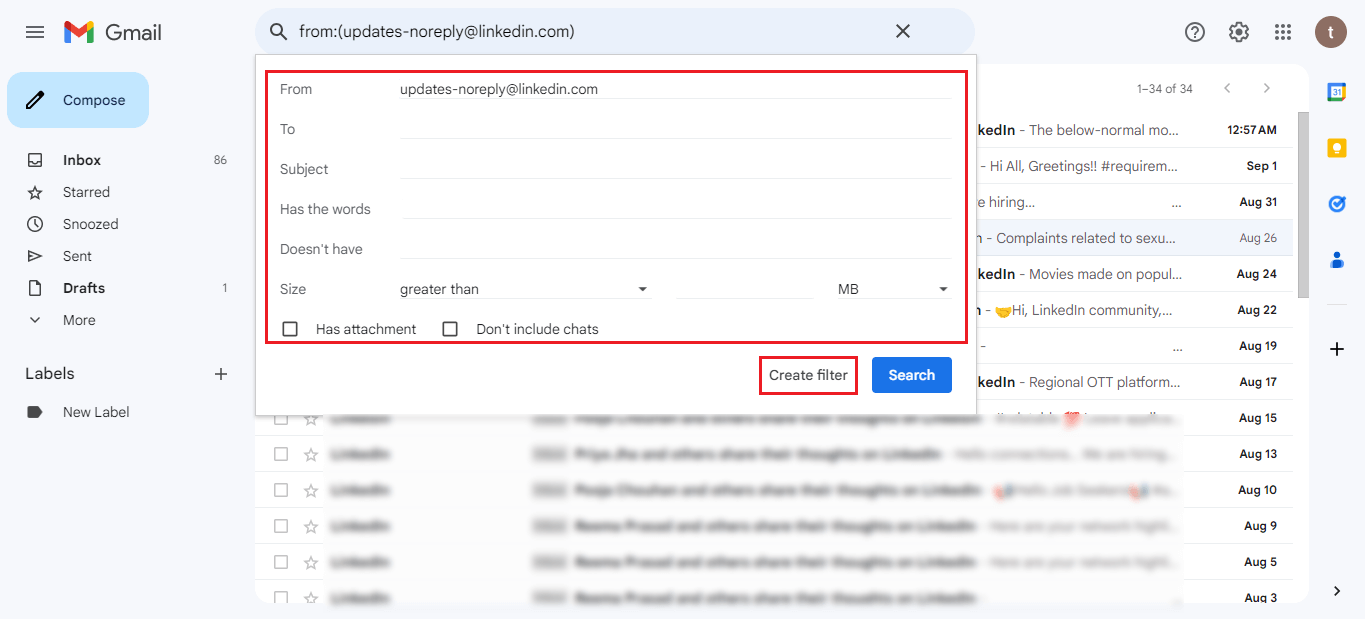
7. Choose Label: Select “Apply the label” and choose the label you created earlier.

8. Select Folder: Optionally, check “Also apply filter to X matching conversations” and select the folder where you want these emails to move.

9. Create Filter: Click “Create filter” to finalize your automated labeling and folder organization.

Method 2: The Priority Inbox Power
Gmail’s Priority Inbox isn’t just about importance; it’s about automation too. Here’s how to set it up:
Step 1: Access Inbox Type Settings
1. Access Settings: Click the gear icon and select “See all settings.”
2. Navigate to Inbox Type: Go to the “Inbox” tab in the settings menu.

Step 2: Selecting Priority Inbox
1. Choose Priority Inbox: Under “Inbox type,” select “Priority Inbox.”

2. Configure Sections: Customize the sections as “Important and Unread,” “Starred,” and “Everything else.”

Method 3: The Auto-Forward and Filter Tandem
This method is perfect for those who receive emails in one account but prefer to manage them in another.
Step 1: Setting Up Auto-Forwarding
1. Access Forwarding Settings: Click the gear icon, go to “See all settings,” and select the “Forwarding and POP/IMAP” tab.
2. Enable Forwarding: Click “Add a forwarding address,” enter the email address you want to forward to, and confirm.

Step 2: Creating a Filter for Forwarded Emails
1. Access Filters: Return to your inbox, click the three dots in a forwarded email, and choose “Filter messages like this.”
2. Set Filter Criteria: Define the conditions for your filter – this can be the sender’s email address.
3. Apply the Label and Choose Folder: Choose a label and a folder where you want these forwarded emails to go.
4. Create Filter: Click “Create filter” to automate the labeling and moving process.
Method 4: The Smart Reply and Categorize Combo
Gmail’s Smart Reply feature can also aid in automatic categorization.
Step 1: Enabling Smart Reply
1. Access General Settings: Click the gear icon, go to “See all settings,” and select the “General” tab.
2. Enable Smart Reply: Scroll down to the “Smart Reply” section and choose “On” to enable this feature.
Step 2: Creating a Category
1. Access Categories Settings: Return to your inbox, click the gear icon, and select “Configure inbox.”
2. Select Categories: Choose the categories you want to enable, such as Social and Promotions.
Conclusion
Creating labels and keeping all emails organized in those folders provides you with a seamless Gmail user experience. Whether you prefer a Priority inbox, filters and labels, or forwarding and categorization, these methods will keep your Gmail account clutter-free and organized. You can opt for any of these solutions to automatically label emails in Gmail and move them to a folder.


You can find a comprehensive collection of trusted pharmaceutical products to suit your health requirements.
This website guarantees fast and reliable delivery wherever you are.
All products is supplied by certified pharmaceutical companies for guaranteed authenticity and compliance.
You can explore our catalog and place your order in minutes.
Got any concerns? Our support team are here to help at any time.
Take care of yourself with reliable online pharmacy!
https://nichebase.xyz/fildena-25-is-a-low-dose-right-for-you/
Наш сервис предлагает помощью иностранных граждан в Санкт-Петербурге.
Оказываем содействие в оформлении документов, временной регистрации, а также процедурах, связанных с трудоустройством.
Наши эксперты помогают по всем юридическим вопросам и подсказывают правильный порядок действий.
Помогаем в оформлении ВНЖ, а также по получению гражданства.
С нами, вы сможете быстрее адаптироваться, упростить оформление документов и комфортно устроиться в этом прекрасном городе.
Пишите нам, для консультации и помощи!
https://spb-migrant.ru/
Что такое BlackSprut?
Платформа BlackSprut вызывает внимание многих пользователей. Но что это такое?
Этот проект обеспечивает разнообразные возможности для своих пользователей. Визуальная составляющая сайта характеризуется простотой, что позволяет ей быть понятной даже для новичков.
Необходимо помнить, что BlackSprut обладает уникальными характеристиками, которые формируют его имидж в своей нише.
Обсуждая BlackSprut, нельзя не упомянуть, что различные сообщества оценивают его по-разному. Одни отмечают его функциональность, а некоторые относятся к нему с осторожностью.
Подводя итоги, эта платформа продолжает быть темой дискуссий и вызывает интерес разных слоев интернет-сообщества.
Ищете рабочее ссылку БлэкСпрут?
Хотите найти свежее ссылку на BlackSprut? Мы поможем.
bs2best at
Сайт может меняться, поэтому важно знать обновленный домен.
Мы мониторим за изменениями чтобы поделиться новым зеркалом.
Посмотрите рабочую версию сайта у нас!
Обзор BlackSprut: ключевые особенности
BlackSprut привлекает обсуждения разных сообществ. Но что это такое?
Этот проект обеспечивает широкие возможности для аудитории. Интерфейс платформы отличается удобством, что делает его интуитивно удобной даже для тех, кто впервые сталкивается с подобными сервисами.
Необходимо помнить, что этот ресурс обладает уникальными характеристиками, которые делают его особенным в определенной среде.
Говоря о BlackSprut, стоит отметить, что многие пользователи имеют разные мнения о нем. Одни отмечают его удобство, а кто-то рассматривают неоднозначно.
Таким образом, эта платформа продолжает быть предметом обсуждений и удерживает внимание широкой аудитории.
Доступ к БлэкСпрут – проверьте у нас
Если ищете обновленный сайт БлэкСпрут, то вы по адресу.
bs2best at
Сайт может меняться, поэтому важно знать актуальный домен.
Мы мониторим за актуальными доменами чтобы поделиться новым линком.
Посмотрите рабочую версию сайта прямо сейчас!
Что такое BlackSprut?
Сервис BlackSprut привлекает внимание многих пользователей. Что делает его уникальным?
Данный ресурс предлагает разнообразные опции для тех, кто им интересуется. Интерфейс системы характеризуется удобством, что позволяет ей быть понятной без сложного обучения.
Важно отметить, что этот ресурс обладает уникальными характеристиками, которые отличают его в своей нише.
При рассмотрении BlackSprut важно учитывать, что различные сообщества оценивают его по-разному. Многие выделяют его функциональность, а некоторые оценивают его с осторожностью.
Таким образом, BlackSprut остается предметом обсуждений и вызывает внимание разных слоев интернет-сообщества.
Рабочее зеркало к BlackSprut – узнайте здесь
Хотите узнать актуальное зеркало на БлэкСпрут? Это можно сделать здесь.
bs2best at
Сайт может меняться, поэтому важно иметь актуальный домен.
Свежий адрес всегда можно найти здесь.
Проверьте рабочую ссылку прямо сейчас!
Eye health requires regular check-ups and awareness of common conditions. Understanding issues like cataracts, glaucoma, or macular degeneration is important. Learning about protective measures like wearing sunglasses benefits long-term vision. Familiarity with medical preparations like eye drops for various conditions is relevant. Knowing when to seek professional eye care is crucial. Access to reliable information promotes good vision habits. The iMedix podcast covers sensory health, including vision care. It serves as an online health information podcast for holistic well-being. Listen to the iMedix online health podcast for eye health tips. iMedix provides trusted health advice for preserving sight.
Self-harm leading to death is a serious topic that affects millions of people worldwide.
It is often connected to psychological struggles, such as anxiety, hopelessness, or addiction problems.
People who struggle with suicide may feel trapped and believe there’s no other way out.
how-to-kill-yourself.com
Society needs to spread knowledge about this matter and help vulnerable individuals.
Early support can reduce the risk, and finding help is a brave first step.
If you or someone you know is in crisis, don’t hesitate to get support.
You are not alone, and support exists.
На этом сайте вы можете наслаждаться большим выбором игровых слотов.
Слоты обладают красочной графикой и интерактивным игровым процессом.
Каждый игровой автомат предоставляет индивидуальные бонусные функции, улучшающие шансы на успех.
1xbet казино
Слоты созданы для как новичков, так и опытных игроков.
Можно опробовать игру без ставки, после чего начать играть на реальные деньги.
Проверьте свою удачу и получите удовольствие от яркого мира слотов.
На этом сайте вы можете играть в обширной коллекцией слотов.
Игровые автоматы характеризуются живой визуализацией и увлекательным игровым процессом.
Каждая игра даёт особые бонусные возможности, улучшающие шансы на успех.
1xbet казино
Игра в игровые автоматы предназначена как новичков, так и опытных игроков.
Вы можете играть бесплатно, после чего начать играть на реальные деньги.
Проверьте свою удачу и получите удовольствие от яркого мира слотов.
Suicide is a serious topic that affects countless lives across the world.
It is often connected to emotional pain, such as anxiety, stress, or substance abuse.
People who consider suicide may feel isolated and believe there’s no other way out.
how to commit suicide without pain
Society needs to talk openly about this matter and support those in need.
Mental health care can make a difference, and talking to someone is a necessary first step.
If you or someone you know is struggling, don’t hesitate to get support.
You are not alone, and support exists.
Our platform provides access to plenty of slot games, suitable for both beginners and experienced users.
On this site, you can explore traditional machines, feature-rich games, and progressive jackpots with stunning graphics and realistic audio.
If you are looking for easy fun or love complex features, this site has something that suits you.
http://elgorsk.ru/image/pages/?preodolenie_apatii_vozvraschenie_k_polnocennoy_ghizni.html
All games can be accessed 24/7, no download needed, and well adapted for both PC and mobile.
Apart from the machines, the site includes slot guides, special offers, and community opinions to enhance your experience.
Register today, start playing, and have fun with the world of digital reels!
This website provides access to plenty of slot games, ideal for all types of players.
On this site, you can find retro-style games, feature-rich games, and progressive jackpots with high-quality visuals and realistic audio.
No matter if you’re a fan of minimal mechanics or love bonus-rich rounds, this site has what you’re looking for.
http://mskomi.ru/baner/pages/vybor_drevesiny_dlya_sauny_preimuschestva_i_nedostatki_razlichnyh_porod.html
Each title are available around the clock, with no installation, and fully optimized for both all devices.
Besides slots, the site features slot guides, welcome packages, and player feedback to enhance your experience.
Sign up, spin the reels, and get immersed in the thrill of online slots!
На нашем портале вам предоставляется возможность испытать широким ассортиментом слотов.
Эти слоты славятся красочной графикой и интерактивным игровым процессом.
Каждый слот предлагает индивидуальные бонусные функции, улучшающие шансы на успех.
1win
Игра в слоты подходит как новичков, так и опытных игроков.
Можно опробовать игру без ставки, и потом испытать азарт игры на реальные ставки.
Попробуйте свои силы и окунитесь в захватывающий мир слотов.
На этом сайте вы найдёте лучшие игровые слоты от казино Champion.
Коллекция игр включает проверенные временем слоты и современные слоты с яркой графикой и специальными возможностями.
Каждый слот создан для комфортного использования как на ПК, так и на планшетах.
Даже если вы впервые играете, здесь вы найдёте подходящий вариант.
скачать приложение champion
Слоты запускаются в любое время и не требуют скачивания.
Дополнительно сайт предоставляет акции и обзоры игр, для удобства пользователей.
Начните играть прямо сейчас и оцените преимущества с играми от Champion!
Здесь вы обнаружите лучшие онлайн-автоматы от казино Champion.
Ассортимент игр представляет проверенные временем слоты и современные слоты с качественной анимацией и специальными возможностями.
Любая игра создан для максимального удовольствия как на десктопе, так и на планшетах.
Будь вы новичком или профи, здесь вы найдёте подходящий вариант.
champion игровые автоматы
Слоты запускаются в любое время и не нуждаются в установке.
Кроме того, сайт предусматривает бонусы и обзоры игр, для улучшения опыта.
Погрузитесь в игру уже сегодня и насладитесь азартом с брендом Champion!
На данной платформе представлены слоты из казино Вавада.
Любой игрок найдёт слот на свой вкус — от простых одноруких бандитов до современных слотов с яркой графикой.
Казино Vavada предоставляет доступ к слотов от топовых провайдеров, включая прогрессивные слоты.
Любой автомат запускается без ограничений и адаптирован как для компьютеров, так и для мобильных устройств.
vavada casino
Каждый геймер ощутит настоящим драйвом, не выходя из квартиры.
Интерфейс сайта проста, что позволяет быстро найти нужную игру.
Начните прямо сейчас, чтобы почувствовать азарт с Vavada!
На данной платформе доступны игровые автоматы от казино Vavada.
Каждый гость может подобрать подходящую игру — от классических аппаратов до видеослотов слотов с яркой графикой.
Казино Vavada предоставляет широкий выбор слотов от топовых провайдеров, включая прогрессивные слоты.
Все игры доступен круглосуточно и адаптирован как для настольных устройств, так и для планшетов.
вавада зеркало сегодня
Каждый геймер ощутит азартом, не выходя из дома.
Интерфейс сайта проста, что даёт возможность быстро найти нужную игру.
Зарегистрируйтесь уже сегодня, чтобы погрузиться в мир выигрышей!
This website, you can access a wide selection of casino slots from famous studios.
Visitors can try out classic slots as well as new-generation slots with high-quality visuals and interactive gameplay.
Even if you’re new or a seasoned gamer, there’s always a slot to match your mood.
play casino
All slot machines are available round the clock and designed for desktop computers and tablets alike.
You don’t need to install anything, so you can jump into the action right away.
Site navigation is user-friendly, making it convenient to find your favorite slot.
Register now, and enjoy the excitement of spinning reels!
This website, you can access a great variety of slot machines from top providers.
Visitors can try out classic slots as well as modern video slots with high-quality visuals and interactive gameplay.
Whether you’re a beginner or a seasoned gamer, there’s always a slot to match your mood.
casino games
All slot machines are available 24/7 and optimized for desktop computers and tablets alike.
You don’t need to install anything, so you can start playing instantly.
The interface is intuitive, making it convenient to browse the collection.
Register now, and enjoy the thrill of casino games!
On this platform, you can discover a wide selection of casino slots from top providers.
Visitors can try out retro-style games as well as new-generation slots with stunning graphics and exciting features.
Even if you’re new or a casino enthusiast, there’s a game that fits your style.
casino slots
All slot machines are instantly accessible round the clock and optimized for laptops and tablets alike.
You don’t need to install anything, so you can jump into the action right away.
Platform layout is user-friendly, making it quick to find your favorite slot.
Register now, and dive into the world of online slots!
Здесь вы сможете найти разнообразные онлайн-автоматы от казино Champion.
Выбор игр содержит классические автоматы и новейшие видеослоты с качественной анимацией и уникальными бонусами.
Каждый слот создан для удобной игры как на компьютере, так и на смартфонах.
Независимо от опыта, здесь вы найдёте подходящий вариант.
скачать приложение
Слоты доступны без ограничений и не требуют скачивания.
Также сайт предусматривает бонусы и рекомендации, чтобы сделать игру ещё интереснее.
Начните играть прямо сейчас и оцените преимущества с играми от Champion!
Платформа BlackSprut — это довольно популярная онлайн-площадок в darknet-среде, открывающая широкие возможности для всех, кто интересуется сетью.
На платформе предусмотрена простая структура, а структура меню не вызывает затруднений.
Гости выделяют стабильность работы и активное сообщество.
bs2best.markets
BlackSprut ориентирован на удобство и безопасность при навигации.
Тех, кто изучает альтернативные цифровые пространства, площадка будет интересным вариантом.
Перед использованием лучше ознакомиться с информацию о работе Tor.
Площадка BlackSprut — это хорошо известная точек входа в даркнете, предоставляющая разнообразные сервисы для всех, кто интересуется сетью.
В этом пространстве предусмотрена удобная навигация, а визуальная часть понятен даже новичкам.
Участники отмечают отзывчивость платформы и активное сообщество.
bs2 bsme
Площадка разработана на приватность и минимум лишней информации при работе.
Если вы интересуетесь инфраструктуру darknet, этот проект станет интересным вариантом.
Перед использованием не лишним будет прочитать информацию о работе Tor.
Платформа BlackSprut — это одна из самых известных систем в даркнете, открывающая разные функции для всех, кто интересуется сетью.
Здесь доступна простая структура, а структура меню понятен даже новичкам.
Пользователи отмечают быструю загрузку страниц и активное сообщество.
bs2 bsme
Сервис настроен на приватность и минимум лишней информации при работе.
Если вы интересуетесь теневые платформы, площадка будет интересным вариантом.
Перед использованием рекомендуется изучить информацию о работе Tor.
На этом сайте можно найти онлайн-игры от казино Vavada.
Каждый пользователь найдёт подходящую игру — от традиционных игр до видеослотов слотов с яркой графикой.
Платформа Vavada открывает доступ к популярных игр, включая игры с джекпотом.
Все игры запускается круглосуточно и подходит как для компьютеров, так и для мобильных устройств.
vavada регистрация
Игроки могут наслаждаться азартом, не выходя из квартиры.
Навигация по сайту проста, что обеспечивает без труда начать играть.
Присоединяйтесь сейчас, чтобы погрузиться в мир выигрышей!
Here, you can find a wide selection of casino slots from famous studios.
Players can experience classic slots as well as new-generation slots with stunning graphics and bonus rounds.
If you’re just starting out or a casino enthusiast, there’s a game that fits your style.
casino games
The games are available anytime and designed for desktop computers and mobile devices alike.
No download is required, so you can start playing instantly.
The interface is intuitive, making it quick to explore new games.
Join the fun, and discover the thrill of casino games!
Этот сайт — официальная страница частного сыскного бюро.
Мы организуем поддержку в решении деликатных ситуаций.
Коллектив опытных специалистов работает с предельной осторожностью.
Мы занимаемся проверку фактов и детальное изучение обстоятельств.
Заказать детектива
Каждое дело подходит с особым вниманием.
Опираемся на современные методы и соблюдаем юридические нормы.
Ищете настоящих профессионалов — вы по адресу.
Онлайн-площадка — цифровая витрина частного аналитической компании.
Мы оказываем поддержку в сфере сыскной деятельности.
Штат детективов работает с повышенной дискретностью.
Нам доверяют наблюдение и разные виды расследований.
Заказать детектива
Любой запрос подходит с особым вниманием.
Мы используем проверенные подходы и ориентируемся на правовые стандарты.
Нуждаетесь в настоящих профессионалов — вы нашли нужный сайт.
Данный ресурс — интернет-представительство частного сыскного бюро.
Мы предлагаем сопровождение в сфере сыскной деятельности.
Группа сотрудников работает с максимальной осторожностью.
Мы берёмся за проверку фактов и детальное изучение обстоятельств.
Услуги детектива
Каждое обращение получает персональный подход.
Задействуем проверенные подходы и работаем строго в рамках закона.
Ищете реальную помощь — вы нашли нужный сайт.
Онлайн-площадка — цифровая витрина независимого детективного агентства.
Мы предлагаем помощь в сфере сыскной деятельности.
Группа профессионалов работает с максимальной дискретностью.
Мы берёмся за проверку фактов и детальное изучение обстоятельств.
Нанять детектива
Любая задача подходит с особым вниманием.
Применяем новейшие технологии и ориентируемся на правовые стандарты.
Нуждаетесь в реальную помощь — вы нашли нужный сайт.
Онлайн-площадка — сайт лицензированного аналитической компании.
Мы оказываем сопровождение в решении деликатных ситуаций.
Штат опытных специалистов работает с предельной осторожностью.
Мы занимаемся сбор информации и разные виды расследований.
Услуги детектива
Любая задача рассматривается индивидуально.
Мы используем новейшие технологии и действуем в правовом поле.
Нуждаетесь в реальную помощь — вы по адресу.
Этот сайт — сайт независимого аналитической компании.
Мы предоставляем сопровождение в решении деликатных ситуаций.
Команда сотрудников работает с максимальной дискретностью.
Мы берёмся за поиски людей и выявление рисков.
Нанять детектива
Любой запрос подходит с особым вниманием.
Применяем современные методы и ориентируемся на правовые стандарты.
Ищете достоверную информацию — добро пожаловать.
Данный ресурс — интернет-представительство лицензированного детективного агентства.
Мы организуем услуги по частным расследованиям.
Команда профессионалов работает с предельной дискретностью.
Нам доверяют поиски людей и разные виды расследований.
Нанять детектива
Любая задача обрабатывается персонально.
Мы используем проверенные подходы и ориентируемся на правовые стандарты.
Ищете ответственное агентство — добро пожаловать.
Данный ресурс — интернет-представительство независимого детективного агентства.
Мы организуем услуги по частным расследованиям.
Команда профессионалов работает с абсолютной осторожностью.
Наша работа включает сбор информации и разные виды расследований.
Заказать детектива
Каждое дело рассматривается индивидуально.
Мы используем новейшие технологии и действуем в правовом поле.
Нуждаетесь в настоящих профессионалов — добро пожаловать.
Лето 2025 года обещает быть непредсказуемым и нестандартным в плане моды.
В тренде будут свободные силуэты и игра фактур.
Модные цвета включают в себя чистые базовые цвета, выделяющие образ.
Особое внимание дизайнеры уделяют аксессуарам, среди которых популярны объёмные украшения.
https://telegra.ph/10-prichin-lyubit-Off-White-kogda-moda-stanovitsya-manifestom-03-07
Снова популярны элементы 90-х, интерпретированные по-новому.
В новых коллекциях уже можно увидеть трендовые образы, которые вдохновляют.
Будьте в курсе, чтобы чувствовать себя уверенно.
Предстоящее лето обещает быть насыщенным и нестандартным в плане моды.
В тренде будут многослойность и яркие акценты.
Гамма оттенков включают в себя мягкие пастели, сочетающиеся с любым стилем.
Особое внимание дизайнеры уделяют деталям, среди которых популярны объёмные украшения.
https://doodleordie.com/profile/lepodium
Снова популярны элементы нулевых, интерпретированные по-новому.
На улицах мегаполисов уже можно увидеть захватывающие образы, которые поражают.
Экспериментируйте со стилем, чтобы вписаться в тренды.
Here offers a wide selection of home wall clocks for every room.
You can explore modern and classic styles to complement your home.
Each piece is curated for its visual appeal and functionality.
Whether you’re decorating a cozy bedroom, there’s always a beautiful clock waiting for you.
best large lighted wall clocks
The collection is regularly expanded with trending items.
We focus on a smooth experience, so your order is always in trusted service.
Start your journey to enhanced interiors with just a few clicks.
This online store offers a great variety of interior wall-mounted clocks for all styles.
You can discover urban and classic styles to match your apartment.
Each piece is carefully selected for its craftsmanship and accuracy.
Whether you’re decorating a functional kitchen, there’s always a matching clock waiting for you.
best atomic analog clocks in stainless steel finish
Our assortment is regularly renewed with new arrivals.
We prioritize customer satisfaction, so your order is always in safe hands.
Start your journey to timeless elegance with just a few clicks.
Here offers a wide selection of interior timepieces for your interior.
You can browse modern and vintage styles to fit your living space.
Each piece is hand-picked for its aesthetic value and functionality.
Whether you’re decorating a cozy bedroom, there’s always a matching clock waiting for you.
oval shaped mantel clocks
The shop is regularly refreshed with exclusive releases.
We ensure customer satisfaction, so your order is always in trusted service.
Start your journey to better decor with just a few clicks.
This website offers a great variety of interior timepieces for all styles.
You can browse minimalist and vintage styles to enhance your living space.
Each piece is carefully selected for its design quality and accuracy.
Whether you’re decorating a creative workspace, there’s always a beautiful clock waiting for you.
vintage old wall clocks
Our assortment is regularly refreshed with trending items.
We focus on secure delivery, so your order is always in professional processing.
Start your journey to timeless elegance with just a few clicks.
This website offers a diverse range of home clock designs for any space.
You can discover modern and traditional styles to complement your home.
Each piece is carefully selected for its visual appeal and functionality.
Whether you’re decorating a stylish living room, there’s always a perfect clock waiting for you.
small mantle clocks
Our assortment is regularly renewed with trending items.
We care about quality packaging, so your order is always in good care.
Start your journey to better decor with just a few clicks.
This website offers a large assortment of interior timepieces for any space.
You can explore urban and traditional styles to enhance your interior.
Each piece is curated for its craftsmanship and reliable performance.
Whether you’re decorating a stylish living room, there’s always a matching clock waiting for you.
best canvas panel art wall clocks
Our catalog is regularly expanded with fresh designs.
We care about a smooth experience, so your order is always in trusted service.
Start your journey to better decor with just a few clicks.
This online store offers a diverse range of interior wall-mounted clocks for every room.
You can check out contemporary and vintage styles to enhance your home.
Each piece is hand-picked for its craftsmanship and durability.
Whether you’re decorating a stylish living room, there’s always a perfect clock waiting for you.
best infinity instruments silo indoor outdoor wall clocks
Our assortment is regularly expanded with trending items.
We focus on customer satisfaction, so your order is always in trusted service.
Start your journey to better decor with just a few clicks.
Here offers a wide selection of interior clock designs for all styles.
You can discover urban and vintage styles to fit your interior.
Each piece is curated for its aesthetic value and reliable performance.
Whether you’re decorating a stylish living room, there’s always a perfect clock waiting for you.
best timex led alarm clocks
Our catalog is regularly refreshed with exclusive releases.
We focus on a smooth experience, so your order is always in good care.
Start your journey to enhanced interiors with just a few clicks.
Платформа предлагает трудоустройства в разных регионах.
На сайте размещены разные объявления от уверенных партнеров.
Система показывает варианты занятости в различных сферах.
Удалённая работа — решаете сами.
https://my-articles-online.com/
Поиск интуитивно понятен и рассчитан на любой уровень опыта.
Оставить отклик очень простое.
Готовы к новым возможностям? — заходите и выбирайте.
Платформа предлагает поиска занятости на территории Украины.
Пользователям доступны разные объявления от настоящих компаний.
Система показывает объявления о работе в разных отраслях.
Подработка — решаете сами.
Работа для киллера Украина
Навигация интуитивно понятен и подстроен на всех пользователей.
Начало работы займёт минимум времени.
Ищете работу? — просматривайте вакансии.