Summary: Upgrading to an SSD (Solid-State Drive) for your computer’s operating system? You might be looking for an effortless way to migrate your OS from your existing storage drive to your new SSD! This blog has got you covered! We’ll walk you through 3 simple methods to migrate OS to SSD, ensuring a faster and smoother computing experience without the tech jargon.
Are you tired of waiting ages for your computer to boot up or load programs? This might be the right time to move your OS to an SSD. An SSD can make your computer much faster, and the best part is that you can take your existing operating system (OS) with you.
In this guide, we’ll explain how to migrate your OS to your new SSD without losing data using easy and straightforward methods. Follow this extensive guide and say goodbye to lagging system startups and applications!
Method 1: Migrating OS to SSD Using Built-in Windows Tools
Step 1: Prepare Your SSD for Action
First things first, ensure your SSD is snugly settled into your PC. Whether you’re using a USB connection cable or plugging it into an NVMe or M.2 slot, make sure Windows recognizes it. For a brand-new SSD, pop into Disk Management and initialize it with the same partition style as your OS drive.
Step 2: Save Your Data with a Backup
Play it smart to steer clear of unexpected system transfer hiccups or data loss mishaps. Create a backup of your precious data on an external hard drive. It’s an insurance policy you’ll be glad you have.
Step 3: Create a System Image of your PC
Head to Control Panel > Backup & Restore > Create a System Image. Then, select a cozy spot, aka a disk, where you’d like to tuck away your system image.
Step 4: Perform a System Image Recovery for the OS Migration
Time to put that system image to work. Grab a trusty USB flash drive, transform it into a Windows installation media, and boot your PC using it. Opt to install Windows on your SSD of choice.
When the installation window greets you, choose “Repair your computer”. Wander into the Troubleshooting window and find the golden ticket – System Image Recovery. Select your system image and let it work its magic, migrating your OS to the SSD.
Step 5: Make Windows Feel at Home on Your New SSD
With your successful OS migration to SSD, let’s make sure Windows feels right at home on your spanking new SSD. Give your PC a reboot and press that F2/F10/Del key to shimmy your way into the BIOS.
Here, set your new SSD as the star of the show in the boot menu. Make sure you have saved all the settings before exiting. Reboot your PC, and there you have it – a sleek, elegant, SSD-powered system ready to dazzle.
Method 2: OS Migration to SSD Using a Third-Party Software
Although it feels quite intimidating to know that switching or upgrading to an SSD will significantly boost your system’s performance. However, installing new Windows OS and applications to the new SSD could be a daunting process.
To make your job simple and efficient, you can use a tried and tested OS to SSD migration software by EaseUS. This EaseUS Partition Master Software is capable enough to help you migrate your existing OS and data to new SSD or HDD. You can also migrate even the latest Windows 11 OS to new SSD using this application.
After completing the migration of OS and other data, you can also wipe data from the old disk to ensure privacy and security of your data. Along with this migration option, you can also perform various actions on disk partitions like format disk partition, convert NTFS to FAT32, recover lost partition, etc.
Steps for OS Migration to SSD Using this Solution:
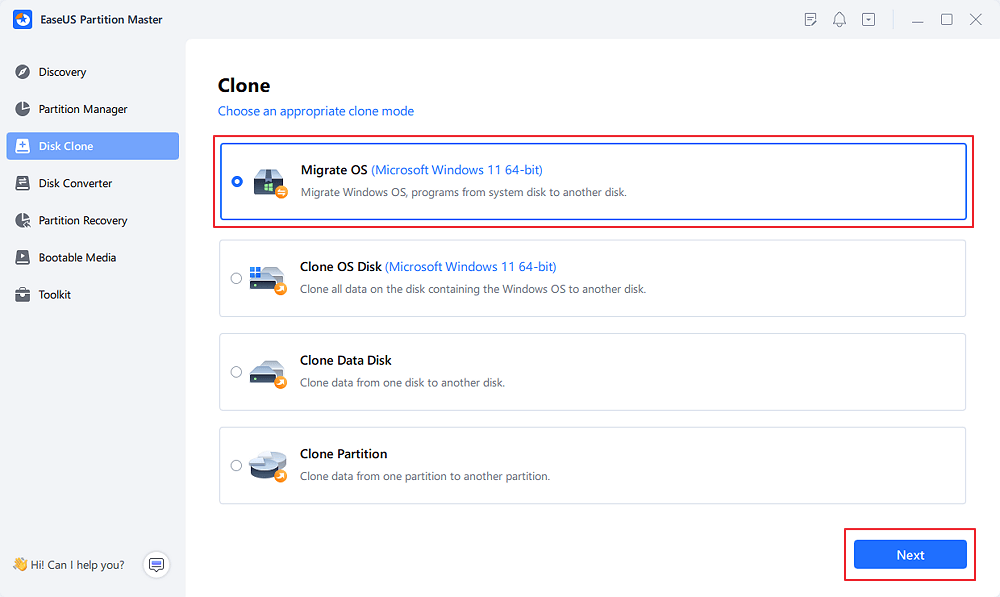
1. Launch EaseUS Partition Master on your system.
2. Go to Clone section and choose Migrate OS option.
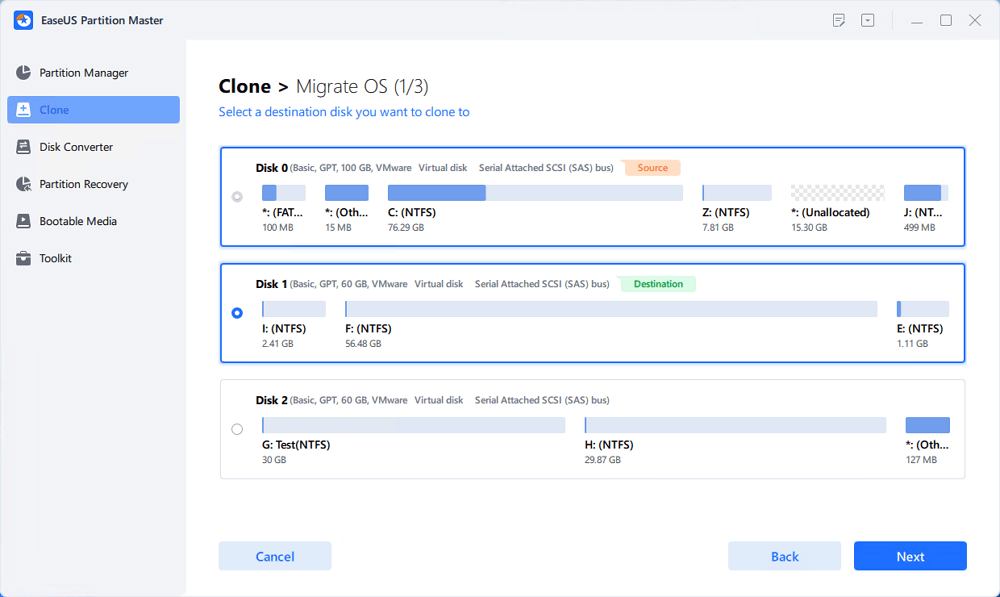
3. Select the destination SSD in which you want to migrate your Windows OS.
4. Now you will get a prompt to confirm this operation. Choose the Yes option to proceed.
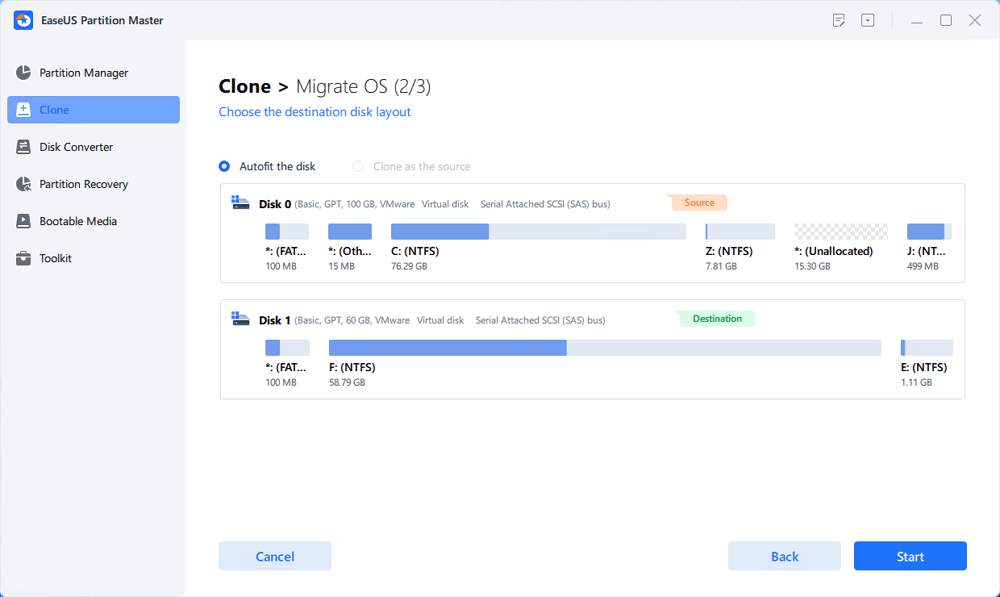
5. Finally, click on the Start button to migrate OS to new SSD.
After you’ve moved your OS to the new SSD, you must ensure your computer can boot from it. Follow these steps:
1. Restart your computer.
2. While it’s restarting, press F2, F8, F11, or Del key to enter the BIOS.
3. Go to the boot section in the BIOS settings.
4. Set the new SSD as the boot drive.
5. Save the changes you made in the BIOS.
6. Restart your computer.
Important Note: When you run your Windows OS through new SSD, you might see an “Activate Windows” message at the bottom right corner. You don’t need to worry about this message because you have changed the disk running the OS. Now to eliminate this message, you need to re-activate the Windows license and verify your account.
Conclusion
Migrating OS to SSD might sound complex, but with these simplified methods, you can enjoy a faster and smoother computing experience. Whether you’re using Windows 11, 10, or any other older version, this article explains two ways to make the switch without the headaches. Say hello to quicker boot times and snappier applications with your new SSD!


2 thoughts on “Best Way to Migrate OS to SSD: No Data Loss Guaranteed”