
Overview: If you are using Windows Server 2012 or 2012 R2, then this is the right time to migrate Windows Server 2012 to 2019. In this extensive guide, we have provided a step by step guide to upgrade to Windows Server 2019 from Windows Server 2012.
Guys, it’s official! Microsoft Windows Server 2012 and Windows Server 2012 R2 are reaching the end of the road by October 10, 2023. But don’t worry. Microsoft has also released two fresh versions for you to explore.
Now’s the time to prepare and get ahead of the game. Let’s jump right into a plan for migrating your trusty old Windows Server 2012/2012 R2 to the shiny new Windows Server 2019.
Can you Upgrade your Windows Server from 2012 to 2019?
So, you’re eager to upgrade, but there’s a critical question: Can you migrate directly to Windows Server 2019 from 2012?
Yes, you can!
However, there is one point that is worth noting: in this, you first have to upgrade Windows Server to 2016 and then to Windows Server 2019. Overall, this is quite a lengthy and time-consuming procedure.
Another way of upgrading Windows Server 2012 to 2019 is by installing a fresh copy of Windows Server 2019 on your device. Following that, you can easily migrate your existing data to the newly installed Windows Server OS using Solution 2.
However, if you’re having Server 2012, you’ll need to have 2016 before reaching the 2019 destination. Alternatively, you can also go for a fresh 2019 install. But remember, backup is your BFF when doing this to prevent data heartaches.
Prepping for the Upgrade
Before you start migrating to Windows Server 2019 from 2012, it’s smart to get your ducks in a row. Some of the important tips are:
- Patch It Up: Make sure your Windows Server 2012 R2 is all patched up with the latest updates. You don’t want any surprises during the upgrade.
- Have the Installation Media Ready: Insert and install the Windows Server 2019 installation media. This will be your trusty companion during the upgrade journey.
- Gather Info: Microsoft advises gathering some information about your device before upgrading Windows Server 2012 to Windows Server 2019. Think of it as a safety net for troubleshooting.
- Pause Virtual Machines: Don’t run any virtual machines while the upgrade is in progress. It’s like letting a chef cook without a kitchen.
- System Image: Create a system image. It’s like making a photocopy of your system. If anything goes awry, you can just hit “undo.”
Some prerequisites that you need to meet:
Processor:
- A 1.4 GHx 64-bit processor that is compatible with x64 instruction set.
- Supports CMPXCHG16b, PrefetchW, and LAHF/SAHF.
- Has DEP and NX support.
- It should support secondary address translation.
Memory:
- Minimum 512 MB RAM (2 GB in case of servers with Desktop Experience install option)
- Error Connecting Code (ECC) type or that kind of technology for physical host deployments.
Disk Space:
- In case of upgrading Windows Server 2012 to 2019, you should have at least 60 GB of free disk space.
- If you are performing a fresh installation, then only 32 GB of free disk space is fine.
Network adapter:
- An Ethernet adapter is mandatory with at least a gigabit throughput.
- It should be compliant with PCI Express Architecture Specification.
Additional requirements:
If you are planning to install OS via DVD media, then you would also need a DVD drive.
The Upgrade Process from Windows Server 2012 to 2019
Now, let’s get to the nitty-gritty of the upgrade process. You have two solutions:
Solution 1: The Direct Upgrade (From Windows Server 2012 R2)
Once you’ve done all your homework, it’s time to perform the upgrade. Here’s how:
Step 1: Open File Explorer and locate the Windows Server Setup media. Usually, it’s a file called setup.exe.
If prompted by User Account Control, give it the green light to make changes to your device.
Step 2: By default, the setup will grab updates automatically. If you don’t want that, tweak the settings and click “Next.”
Step 3: Enter your product key when prompted.
Step 4: Select the edition of Windows Server you want to install and proceed.

Step 5: Review the notices and license terms. If you’re on board, hit “Accept.”
Step 6: Opt for the “Keep personal files and apps” option for an in-place upgrade.
Step 7: After the setup analyzes your device, it will show the “Ready to install” screen. Click “Install.”
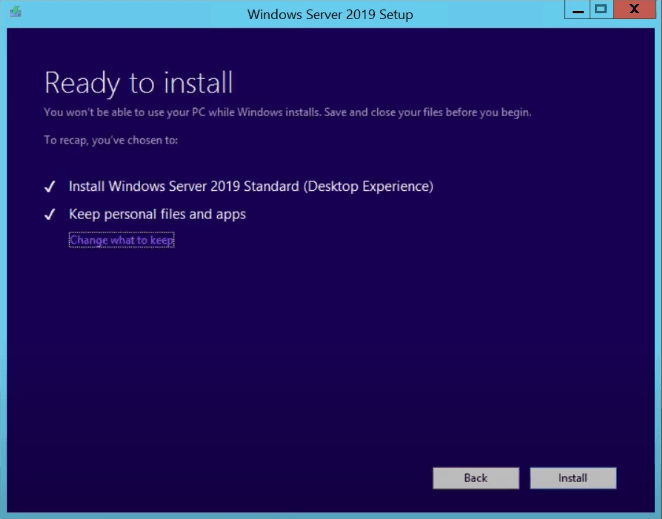
Sit back, relax, and watch the progress bar as your upgrade unfolds. Once it’s done, your server will restart, and you’re on your way to Windows Server 2019!
Solution 2: Migrate Windows Server 2012 to 2019 Using the Professional Tool
If you are choosing an easy way to upgrade from Windows Server 2012, i.e. by installing a fresh copy of Windows Server 2019 and migrating your old data to a new OS, then this solution is perfect for you. EaseUS Todo PCTrans allows you to transfer all your data, installed applications, settings, and accounts without any re-installation.
This utility supports migration of applications like Adobe software, AutoCAD, Microsoft Office, Spotify, Dropbox, McAfee, Skype, Apple application, and many more. You can also take 24/7 free assistance in case you face any issues while migrating to Windows Server 2019 from Windows Server 2012.
Step by Step Guide to Use the Application
1. Launch the application on both your old and new servers and ensure that both systems are on the same internet.

2. Select “PC to PC” option and choose your destination PC via its device name. Upon selecting the device, you need to verify via Account Password or Verification Code for successful connection.

3. Select the categories you want to transfer – Applications, Files, and Accounts.
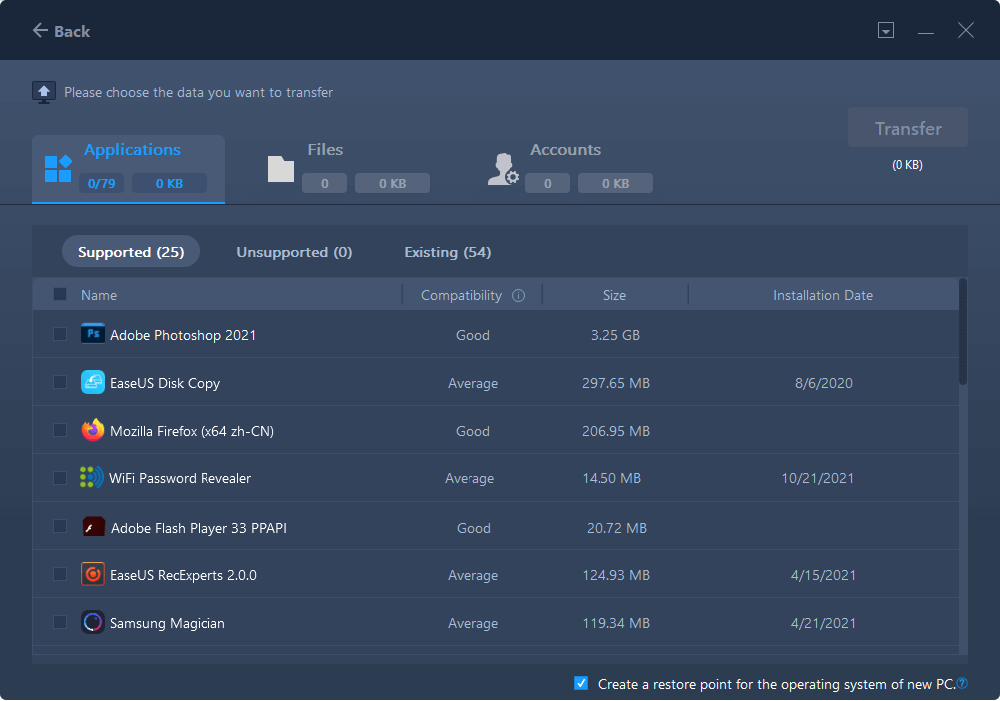
4. Click “Transfer” and let the magic happen. Your apps, files, and accounts will be whisked away to the new server.

5. After migrating Windows Server 2012 to Windows Server 2019, restart your new Windows Server 2019. If some applications need reactivation, simply use your old keys to get them up and running again.
Final Words
There you have it, a guide to migrating from the soon-to-be-retired Windows Server 2012 to the modern and robust Windows Server 2019. Remember, planning and preparation are key to a smooth migration of Windows Server 2012 to 2019. So, whether you choose the direct upgrade or opt for a fresh start with migration tools, make sure to back up your data and follow the steps diligently.


Very interesting subject, thanks for posting.Raise blog range