Summary: Upgrading to a new SSD can be a task but the most important part is to transfer Windows license to new SSD. In this article, we are going to understand the different ways to transfer the license. Stick till the end of the blog to gather all the information about the methods as well as how to deactivate your old setup.
Anyone who is upgrading their SSD would want to move everything important to them in the new one. There are various things that you could transfer including your Windows license. If you are also looking for a solution to do that, we’ve got you covered!
Don’t worry about the methods or the process to transfer Windows 10, 11 license to new SSD. In this friendly and straightforward guide, we’ll show you how to transfer your license to your shiny new SSD step-by-step.
Whether you’re a tech guru or a novice, you’ll be able to follow along and get your Windows 10 up and running in no time. We are going to share a detailed guide with the best methods available to ease your pain.
Let’s get started!
What Are the Steps to Follow to Transfer Windows License to New SSD?
One method is to deactivate your old Windows installation with simple Command Prompt commands, then activate it on your new SSD. This is a manual method which you need no tool for completing the procedure.
Whether you prefer the DIY approach or need Microsoft’s support, our guide makes it a breeze.
Moving further, let’s start with the first step.
Step 1 – Deactivate Your Old Windows 10 Setup
You need to deactivate the old installation before you can activate and transfer Windows 10, 11 license to new SSD. It’s as easy as pie:
1. Click on the Start button.
2. Search for “Command Prompt,” right-click on it, and choose “Run as administrator”
3. Type this command: slmgr /upk and press Enter.

4. Now, if you don’t see the “Uninstalled product key successfully” message right away, don’t worry. You should run the command a few more times until it shows up.
5. Type this command: slmgr /cpky and press Enter.
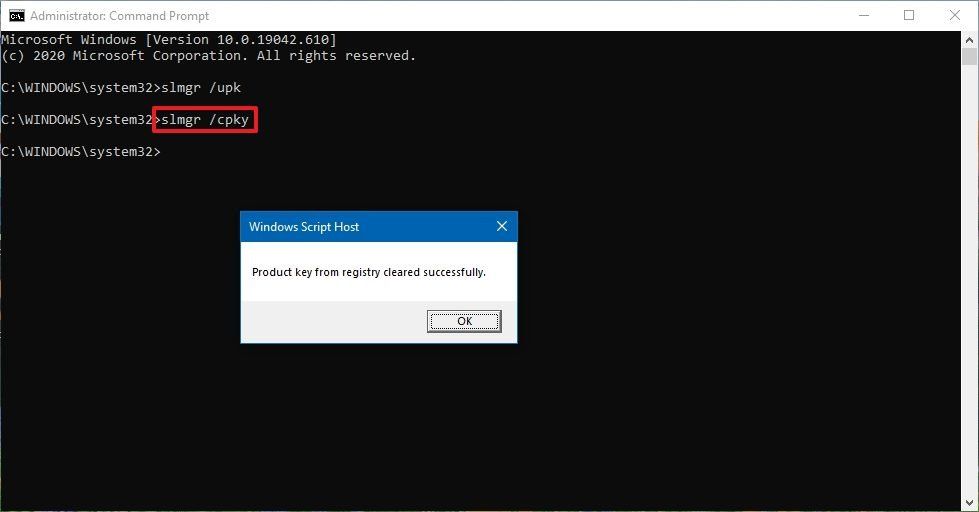
With these simple steps, you’ve successfully removed the product key from your old system and are ready to use it on your new computer.
Transfer Windows 10 License to New SSD by Activating New Windows 10 Setup
Once your old Windows 10 setup is deactivated, it’s time to activate your new one. Here’s how you can do it:
Step 2 – Install License Using Command Prompt
1. Click on the Start button.
2. Search for “Command Prompt,” right-click on it, and choose “Run as administrator.”
3. Type this command: slmgr /ipk xxxxx-xxxxx-xxxxx-xxxxx-xxxxx and replace the x’s with your product key.

4. Now, type this command: slmgr /dlv and look for “Licensed” under the “License Status” section.

5. If you see “Licensed” congratulations!

6. However, if it says “Notification” simply restart your computer and check again.
7. You can verify the activation status in Settings > Update & Security > Activation.
Transfer Windows License to New SSD by Installing License Using Microsoft Support
If you face any issues with the Command Prompt method, don’t fret. You can still activate your Windows 10 with a little help from Microsoft support. Here’s how:
1. Click on the Start button.
2. Search for “Command Prompt,” right-click on it, and choose “Run as administrator”
3. Type this command: slui 4 and press Enter.

Now, follow these steps:
1. Select your region in the activation wizard.
2. Click the “Next” button.
3. Use the toll-free number provided to call Microsoft.

If you prefer not to make a phone call, there’s an alternative method using the “Get Help” app to transfer Windows 10, 11 license to new SSD:
- In the “Get Help” app, share details about the problem.
- Send the “Installation ID” as provided in the wizard.
- The virtual assistant will provide a “Confirmation ID” for activation.
Once you have the confirmation ID, continue with these steps:
- Confirm the Installation ID number.
- Click the “Enter confirmation ID” button.
- Type in the “Confirmation ID” provided by Microsoft support.
- Click the “Activate Windows” button.
Voila! Your Windows 10 should now be activated without any major issues. It’s like having a guardian angel for your Windows license.
Concluding Points
Transferring Windows license to new SSD might sound daunting, but trust us, with the right methods, it can be done. Whether you choose the Command Prompt method or seek assistance from Microsoft support, you’ll have your Windows 10 up and running smoothly on your new setup in no time.
So, don’t fret about upgrading your hardware; go ahead and enjoy the benefits of your new SSD with your trusted Windows 10 by your side. If you encounter any hiccups along the way, remember that Microsoft support is there to lend a hand. Happy computing!